Training Page:
OSD Menu Options: COR-556H MIGHTY MINI Security CameraSetup Menu
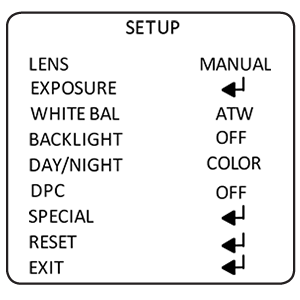
LENS - MANUAL/AUTO. Interacts with EXPOSURE menu settings (see explanation at right).
EXPOSURE - Presents a sub-menu that contains lens shutter settings, AGC, BRIGHTNESS and DVDR option. See explanation at right.
WHITE BAL - White balance options. Contains two preset auto-tracking white balance settings, and two manual settings. See explanation at right.
BACKLIGHT- Backlight compensation settings. BLC, OFF, or HLC (High Light Compensation). See explanation at right.
DAY/NIGHT - Controls switching between day and night mode. See explanation at right.
DPC - Dead pixel compensation. See explanation at right.
SPECIAL - Invokes secondary menu, shown below.
RESET - Resets camera to PrePro settings.
EXIT - Exits OSD menu and saves settings.
SPECIAL Menu
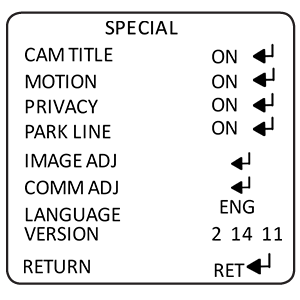
Explanations for each of these settings can be found at right.
CAM TITLE - Lets you create an on-screen title to identify the scene. Turn it ON or OFF.
MOTION - ON or OFF. When ON, it sets motion detection.
PRIVACY - ON or OFF. When ON, it enables the creation of up to 8 privacy masks.
PARK LINE - ON or OFF. When ON, it superimposes a line on-screen for easy identification of property limits and borders.
IMAGE ADJ - Contains a number of video image adjustments, like CONTRAST and SHARPNESS, as well as some new settings like NEG IMAGE. See explanation at right.
LANGUAGE - Two selections, English and Traditional Chinese.
Setup MENU EXPLANATIONS
Lens Options
The LENS selection has two options - MANUAL and DC. There is no sub-menu.
LENS settings allow you to set up two shutter profiles in the EXPOSURE sub-menu and switch between them. You can set the shutter to one value when LENS is set to MANUAL, and you can set the shutter to a different value when the LENS is set to DC. See EXPOSURE, below, for more information.
NOTE: The COR-588 has a fixed focus lens.
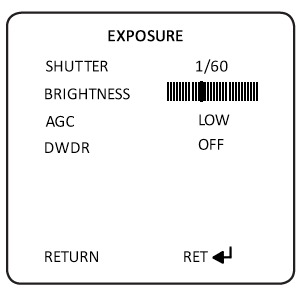
EXPOSURE Options
This sub-menu setting gives SHUTTER setting options, BRIGHTNESS, AGC and DWDR settings.
SHUTTER: Sets video sensor shutter. You can create two setting profiles with help from the LENS setting (above). When LENS is set to MANUAL the camera will save the shutter setting you specify here, and save a different setting when LENS is set to DC. By changing the LENS option (DC or MANUAL), you can switch between the two different shutter settings.
Shutter settings include FLK (anti-flicker), AUTO, and value of 1/60 sec to 1/100000 sec..
BRIGHTNESS: Set brightness with the slidebar control. A numeric value is on-screen to aid you with repeat settings (very helpful if you need to set up multiple cameras or are trouble-shooting). This setting does not change, regardless of LENS being set to MANUAL or DC.
AGC (Auto-Gain Control): Set to LOW, MIDDLE, HIGH, or OFF. This setting does not change, regardless of LENS being set to MANUAL or DC.
DWDR (Digital Wide Dynamic Range): Set to Low, Middle, High or OFF. This setting does not change, regardless of LENS being set to MANUAL or DC. Set OFF or ON.When you turn it on you can navigate to a simple third-level menu that lets you set a DWDR LEVEL (using a slidebar control). Like AGC and BRIGHTNESS, this setting does not change when you switch LENS from MANUAL or DC or vice-versa.
White balance options include ATW1 and ATW2 (Auto-tracking white balance with two different parameters), MANUAL, and AWC->SET.
ATW1 & ATW2: Preprogrammed auto-tracking white balance settings.
AWC->SET: To set white balance using this option you need to point the camera at a white object, make sure it fills as much of the screen as possible, then click the mini-joystick. The camera will reproduce colors using the color you presented as a baseline. While it can be very accurate this white balance method is best left to professional photographers who are adept at color adjustment and reproduction.
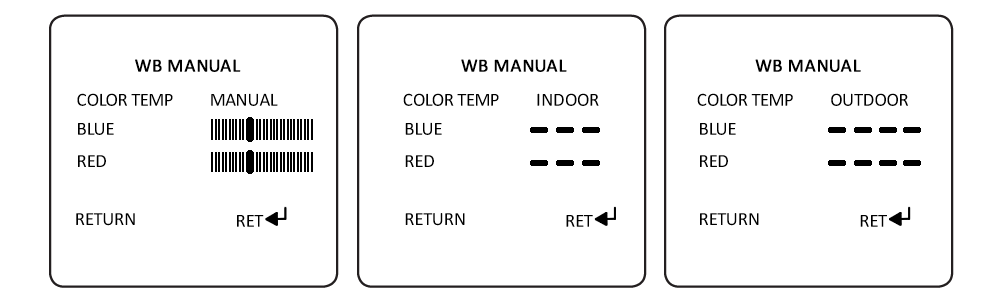
MANUAL:The fourth WB option gives the user a sub-menu with three settings - INDOOR, OUTDOOR, and MANUAL
INDOOR and OUTDOOR are pre-programmed settings that are designed to operate under sunlight (outdoor) conditions or artificial light (indoor) conditions. Color temperatures are set accordingly and there is no user adjustment required.
If you select MANUAL then youcan manually set BLUE and RED color levels. (The color GREEN automatically adjusts based on the levels you set so a third control for GREEN is not provided.)
BACKLIGHT Options
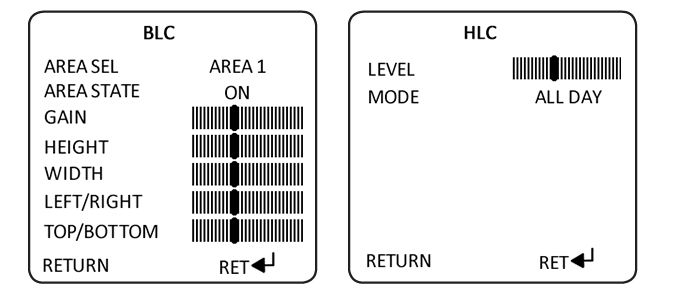
There are 3 settings for backlight compensation options and no sub-menus. Available settings are OFF (no compensation), BLC (Back Light Compensation enabled), and HLC (Back Light Compensation with High Light Compensation).
BLC: Turns traditional backlight compensation on. A sub-menu appears, shown at left, that allows the user to create up to 4 fields (AREA 1 through AREA 4), turn the area on or off (AREA STATE), modify the backlight gain (slidebar control) in that area, and place the area anywhere on-screen using the four remaining slidebar controls.
HLC:Some thieves and unsavory individuals have learned that you can momentarily disable some CCTV cameras by shining bright lights directly at the camera lens. HLC is one of several methods developed to combat this threat. When HLC is active it will mask the source of the bright light with a dark shape, thus allowing the area to the side of the light source to be viewed and recorded. People who think they are concealed in a halo of hazy white light will be revealed.
DAY/NIGHT Options
This sub-menu governs how the camera handles color and how it changes between day and night mode and back. Four options are available, EXT and COLOR (no sub-menus), and B/W and AUTO modes, explained below.
B/W Mode
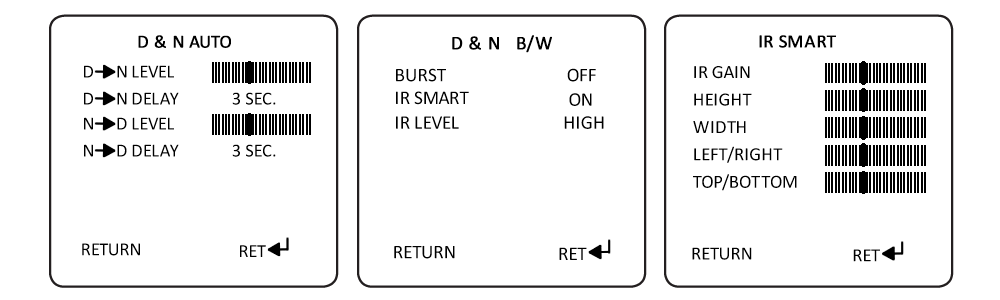
Sets black-and-white mode. The D&N B/W sub-menu appears, shown above.
BURST: Alters the color burst information passed to the video monitor. Since this is B/W mode, it doesn't effect color but can effect gain. If your monitor is showing a poor image and you are using long runs of cable, changing this setting from OFF to ON may improve the situation.
IR SMART: ON or OFF. When ON, you get the IR SMART menu, shown above. The IR SMART menu lets you select an area on screen (defined by the slidebars HEIGHT, WIDTH, LEFT/RIGHT and TOP/BOTTOM) where IR light can be detected. The IR GAIN slidebar is self explanatory - it controls signal gain in the area you define.
IR LEVEL: Two options, HIGH and LOW. Increases IR sensitivity.
AUTO Mode
This mode lets the camera auto-switch between color video mode and black-and-white video mode, depending on light levels. You get a sub-menu, shown above, that lets the user control the switching.
D->N and N->D Level: Set the light level that triggers the switch from day/night mode to the other mode.
D->N and N->D Delay: Sets a delay time before the switch is made. This can be useful if the camera is placed in an area subject to shadows or intermittent light level changes. If the camera is switching back and forth between modes all the time (thrashing), increase the delay.
DPC (Dead Pixel Compensation) Mode
Sometimes video sensors can develop a dead pixel. This does not disable a camera but may make the image a little annoying to look at. Dead Pixel Compensation, when invoked, finds dead pixels and marks them digitally. The camera will compensate (in DSP phase) by assigning a value to the place where that dead pixel would have, if functional, provided video data. The value is typically the average of the color/luminance values of the pixels immediately surrounding it.
USING DPC: To invoke DPC you must first completely cover the lens (zero light condition). Then turn DPC on. The screen will flash momentarily. When it stops the process is complete.
DPC is provided strictly as a convenience and a way to extend product life. Dead pixels are very rare and almost never occur, and when they do it usually takes years before they develop. Even then, its rare to see more than one or two, especially with modern CCD designs. Unfortunately there is no way to predict their occurrence, even in the highest priced equipment. But when (and if) they do it's very un-economical to trash a good camera because a tiny pixel is locked permanently white, for instance. Most users will never use this feature.
SPECIAL Menu
This option invokes the secondary menu, explained below, after RESET and EXIT.
RESET Options - PrePro Feature
Self explanatory. Resets the camera to factory defaults settings.
The only thing notable here is the PrePro feature. The PrePro feature makes sure all of the OSD menu options are set to a premium configuration, giving the user optimal video under the widest variety of possible surveillance environments. While PrePro is not perfect every time in every setting, it can save you substantial time setting up the camera or recovering settings when someone accidently sets the OSD options in such a way as to make the camera produce inferior video. You do not have to turn PrePro on - it is automatic and occurs whenever you reset the camera.
EXIT
Exit the OSD, saves settings.
SPECIAL MENU Settings
CAM TITLE Option

Standard option seen in many CCTV cameras. Allows you to set and display a name for the camera. The name appears on the monitor and can be recorded to help identify the scene. Very useful in large installations.
Standard alphanumeric letters and symbols are provided.
MOTION Options
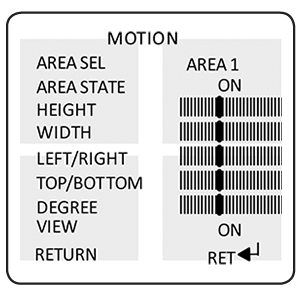
This sub-menu allows the user to create up to 4 different motion detections zones, each one with their own parameters.
AREA SEL: Up to 4 zones can be created and configured, this menu item determines which zone you are working on. AREA 1 through AREA 4 can be selected.
AREA STATE: Turn on the area or turn it off. When off, no motion detection (in that area) occurs. When an area state is ON, an icon appears in the bottom left corner of the monitor when motion is detected.
HEIGHT, WIDTH, LEFT/RIGHT and TOP/BOTTOM: Lets the user create the motion detection zone, using the slidebar settings. A number appears on screen beside the slidebar to help duplicating settings or troubleshooting.
DEGREE: Controls motion detection sensitivity, via the slidebar.
VIEW: ON or OFF. When ON, it creates a pattern of red squares on-screen in the area where motion occurs. Serves to highlight motion.
PRIVACY Options
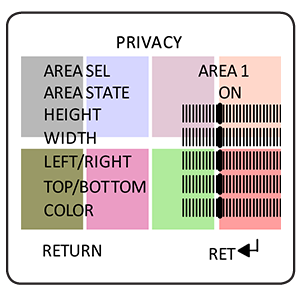
This camera allows sophisticated privacy mask creation and control. You can make up to 8 separate privacy masks.
AREA SEL: Area 1 through Area 8. By selecting an area, all other options you set effect that area alone. Area 1 can be in a different location, color, size, etc. than Area 2, Area 3, etc.
AREA STATE: Turns the mask in that area on or off.
HEIGHT, WIDTH, LEFT/RIGHT and TOP/BOTTOM: Lets the user set the size and shape of the privacy mask zone, using the slidebar settings. A number appears on screen beside the slidebar to help duplicating settings or troubleshooting.
COLOR: 16 different colors are available so masks can be easily identified.
PARK LINE Options
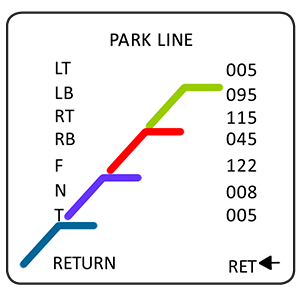
Superimposes a colored line on screen for easy identification of borders and limits.
LT/LB and RT/RB: Left Top, Left Bottom and Right Top, Right Bottom. Determines the top and bottom positions for the lines.
F (FAR): Moves the far end of the lines.
N (NEAR): Moves the nearest end of the lines.
T (THICKNESS): Adjusts thickness of the line.
IMAGE ADJ Options
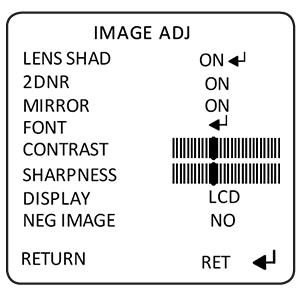
This sub-menu provides all the standard image adjustment features normally found in CCTV video cameras as well as enhanced features specific to this model.
LENS SHAD: Presents a sub-menu with one slidebar that the user can adjust in order to compensate for smoke-tinted domes.
2DNR: 2-dimensional dynamic noise reduction. Select ON or OFF.
MIRROR: Flips video image on the horizontal plane.
FONT: Lets the user select a font color for OSD menu selections.
CONTRAST & SHARPNESS: Standard video contrast and sharpness adjustments.
DISPLAY: Three options are available - USER, CRT and LCD. Each has it's own simplified sub-menu. You can tailor video output for best results using a CRT or an LCD monitor. The USER option provides a unique setting.
NEG IMAGE: Create a photographic negative image of the video.
Language, Version, Return
LANGUAGE: English or Chinese
VERSION: This field indicates ROM version and can be useful in troubleshooting.
RETURN: Takes the user back to the first level setup menu and holds the settings you made. You must EXIT to save all settings.
OUR FOCUS IS YOUR PROFIT
Cortex Security Solutions
OUR FOCUS IS YOUR PROFIT | Cortex Security Solutions
CORTEX Inc. Copyright 2026 -
All rights reserved